41 how to create labels using mail merge in word 2010
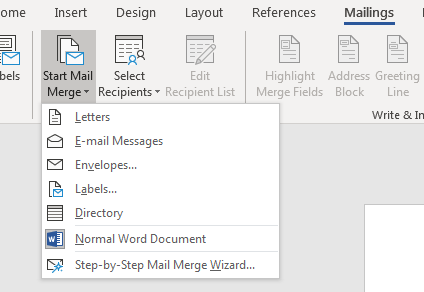
How to create name badges using mail merge in Word 2010 RedCape Answer: If your list of attendees is stored in Excel, you can use the mail merge feature in Word 2010 to quickly and easily create name tags. The trick is to set up one name tag the way you want it and use the "Update Labels" command to create the remaining labels. If playback doesn't begin shortly, try restarting your device ... How to mail merge and print labels from Excel - Ablebits (Or you can go to the Mailings tab > Start Mail Merge group and click Start Mail Merge > Labels .) Choose the starting document. Decide how you want to set up your address labels: Use the current document - start from the currently open document.
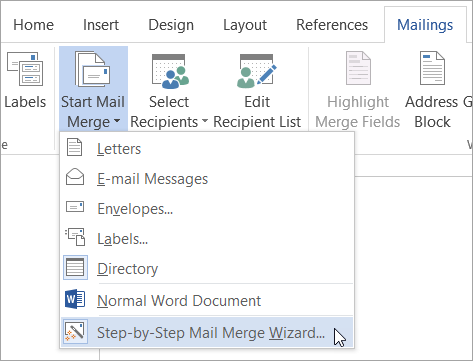
Video: Create labels with a mail merge in Word Once your mailing addresses are set up in an Excel spreadsheet (see the previous video to learn how), it's a snap to get Word to create mailing labels from them. Create your address labels In Word, click Mailings > Start Mail Merge > Step-by-Step Mail Merge Wizard to start the mail merge wizard.

How to create labels using mail merge in word 2010
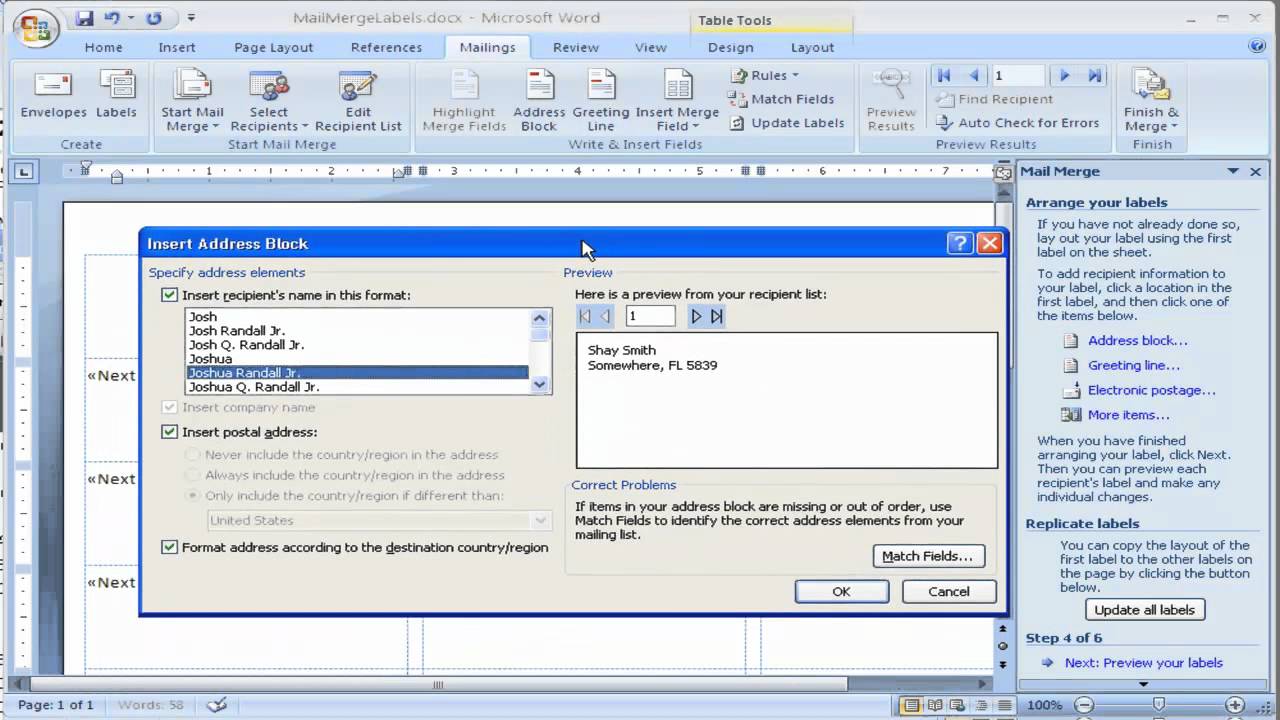
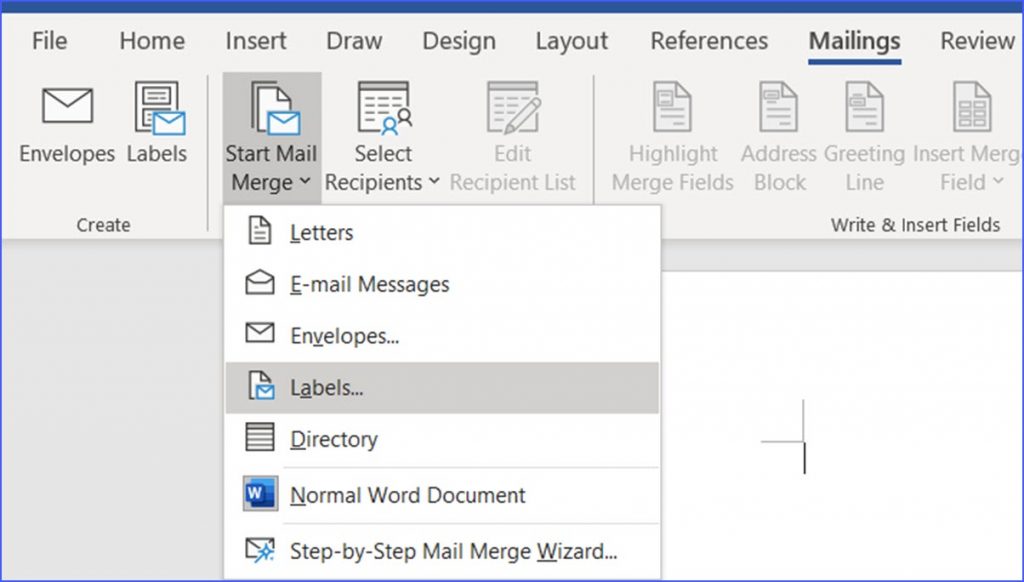
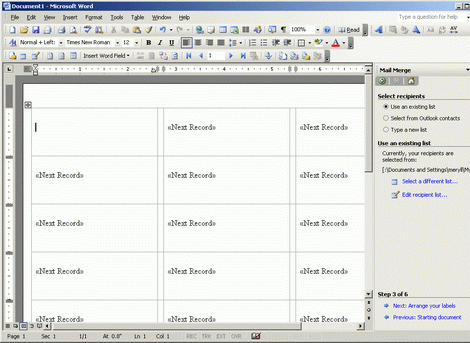
How to Make Mailing Labels from Excel by Using Mail Merge Find your Excel spreadsheet from Step #1 and click Open . 8. Review the data and click Ok. Click Next: Arrange your labels. 9. Move your cursor to the first label and click Address block. Select your preferred formatting (using the preview pane). 10. How to Create and Print Labels in Word Using Mail Merge and Excel ... Click the Mailings tab in the Ribbon and then click Start Mail Merge in the Start Mail Merge group. From the drop-down menu, select Labels. A dialog box appears. Select the product type and then the label code (which is printed on the label packaging). You may also select New Label and then enter a custom name and size. Click OK. How To Print Address Labels Using Mail Merge In Word Open Word and create a blank document. Click on the MAILINGS tab at the top of the page. Click on START MAIL MERGE and select STEP BY STEP MAIL MERGE WIZARD. This opens the Mail Merge Wizard panel on the right hand side of your screen. This panel will guide you through the SIX STEPS of the mail merge.
How to create labels using mail merge in word 2010. How to Perform a Mail Merge in Word 2010 - wikiHow Launch Word 2010. 2 Navigate to Mailings Tab. 3 Go to Start Mail Merge options. 4 Click Step by Step Mail Merge Wizard. 5 Choose the type of document you want. 6 This step will ask you to choose what document to use/type document now. 7 Choose your recipients. 8 Choose the Excel worksheet that has your chosen recipients. 9 Click Open. 10 How to Create Mailing Labels in Word from an Excel List Step Two: Set Up Labels in Word Open up a blank Word document. Next, head over to the "Mailings" tab and select "Start Mail Merge." In the drop-down menu that appears, select "Labels." The "Label Options" window will appear. Here, you can select your label brand and product number. Once finished, click "OK." Word 2010: Using Mail Merge - GCFGlobal.org Open an existing Word document, or create a new one. Click the Mailings tab. Click the Start Mail Merge command. Select Step by Step Mail Merge Wizard. The Mail Merge task pane appears and will guide you through the six main steps to complete a merge. PDF How to Use Mail Merge to Create Mailing Labels in Word On the Mailings tab, click Start Mail Merge, and then click Step by Step Mail Merge Wizard. This will open a set of directions on the right side of the screen that we will be following. 1. Under Select document type, click Labels, and then click Next: Starting Document. (way at the bottom right of the screen) 2.
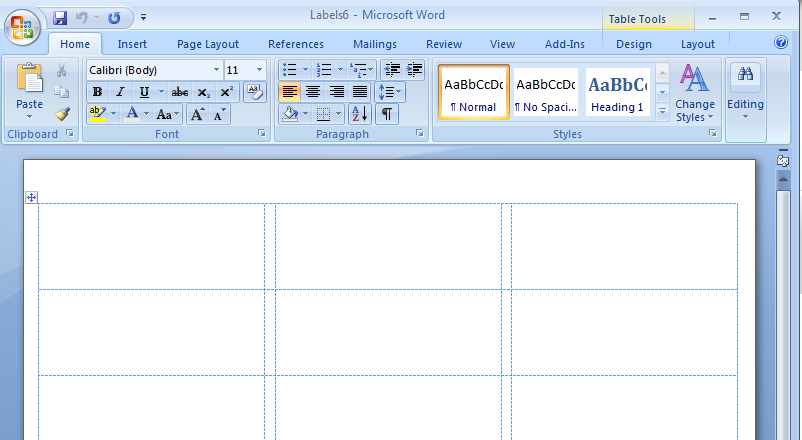
How to use addresses from an Excel worksheet to create labels in Word Create a new sheet of labels: Click Change document layout. Click Label options. In the Label Options dialog box, select the options that you want, such as the label type and size, and then click OK. For help with an option, click the question mark, and then click the option. Start with an existing sheet of labels: How to Print Address Labels from Word 2010 - Solve Your Tech Step 2: Launch Microsoft Word 2010. Step 3: Click the Mailings tab at the top of the window. Step 4: Click the Labels button in the Create section of the ribbon at the top of the window. Step 5: Type your address into the Address field at the center of the window. Step 6: Check the option to the left of Full page of the same label in the Print ... PDF ESSENTIAL MICROSOFT OFFICE 2010 7 MAIL MERGE AND RELATED ... - Pitt Fig. 7.2 The Mail Merge Task Pane The process of merging data with a form letter involves the following six steps: 1. Select the document type. 2. Select the starting document. 3. Select the recipients of the form letter. 4. Write your form letter. 5. Preview the merged letters. 6. Complete the mail merge. How to Create Mail Merge Labels in Word 2003-2019 & Office 365 Microsoft Word 2010 Mail Merge Open on the "Mailings" tab in the menu bar. Click "Start Mail Merge." Select "Step by Step Mail Merge Wizard." Ensure "Change document layout" is selected and click "Next: Select recipients." Choose "OnlineLabels.com" from the second dropdown list and find your label product number in the list. Click "OK."
Create and print labels using mail merge - Sibanye-Stillwater On the Mailings tab, in the Start Mail Merge group, choose Start Mail Merge > Labels. In the Label Options dialog box, under Label Information, choose your label supplier in the Label vendors list. In the Product number list, choose the number that matches the product number on your package of labels. Mail merge labels in Word 2010 - Microsoft Community Type a space and insert another field (such as Last_Name), or press Enter to go to the next line and insert a field. Continue until the top left cell of the table contains all the fields you need for the label. On the Mailings ribbon, click Update Labels, which repeats the merge fields on all the other labels. How to mail merge and print labels in Microsoft Word Step one and two In Microsoft Word, on the Office Ribbon, click Mailings, Start Mail Merge, and then labels. In the Label Options window, select the type of paper you want to use. If you plan on printing one page of labels at a time, keep the tray on Manual Feed; otherwise, select Default. Microsoft Word Mail Merge Address Labels Video: Create labels with a mail merge in Word . great support.microsoft.com. Create your address labels. In Word, click Mailings > Start Mail Merge > Step-by-Step Mail Merge Wizard to start the mail merge wizard. Choose Labels, and then click Next: Starting document. Choose Label options, select your label vendor and product number, and then ...
how to create a mail merge labels using ms excel 2007 & ms word 2007 - YouTube
How to Create Mail-Merged Labels in Word 2013 - dummies > field, pressing Shift+Enter, inserting the < > field, typing a comma and a space, inserting the < > field, typing two spaces, and inserting the < > field. Choose Mailings→Update Labels. The code from the upper-left cell is copied to all the other cells. Choose Mailings→Preview Results. The four label results appear. Save the document.
Using Mail Merge in Word 2019 | UniversalClass
Create Labels Using Mail Merge in Word 2007 or Word 2010 How to create labels using the mail merge feature in Word 2007 or Word 2010
How to create Labels using Mail Merge in Microsoft Word 2007 - YouTube
Mail Merge for Dummies: Creating Address Labels in Word 2007 1. Before you start make sure you have your Excel spreadsheet ready. Now open up Microsoft Word 2007 and click on the Merge tab. 2. Next, click on the Start Mail Merge button and select Labels. 3. Now it's time for you to select the Label Vendor. In my case I am going to use Avery US Letter. 4.

Mail Merge Labels in Microsoft Word - Office Articles
Microsoft Word 2010 Creating Labels Using Mailmerge - YouTube Learn how to create labels using Microsoft Word's Mailmerge feature. Very easy in few, simple steps. Learn how to customize your labels or use the quick and ...
How To Create 21 Labels In Word : Create Labels in MS Word from an Excel Spreadsheet - D ...
How to create name badges using mail merge in Word 2010 The trick is to set up one name tag the way you want it and use the "Update Labels" command to create the remaining labels. Check out the video here: Create name tags using the Mail Merge feature in Microsoft Word Watch on Loading... Posted in Word 2010 and tagged Mail merge, Name tags ← Older Entry Newer Entry → Categories Access 2007 Access 2010

Word mail merge tutorial
Use mail merge for bulk email, letters, labels, and envelopes Create and print sheets of mailing labels Directory that lists a batch of information for each item in your data source. Use it to print out your contact list, or to list groups of information, like all of the students in each class. This type of document is also called a catalog merge. Create a directory of names, addresses, and other information
How to Create Labels in Word - ExcelNotes
How to Mail Merge Address Labels Using Excel and Word Place the first names in Column A. Place the last names in Column B. Place the street addresses in Column C. Place the cities or towns in Column D. Place the county in Column E. Place the postal codes in Column F. Save the file. Remember the location and name of the file. Close Excel.
Create a directory of names, addresses, and other information - Word
How to Create Labels With a Mail Merge in Word 2019 Go to Mailings > Start Mail Merge > Labels. In the Label Options dialog box, choose your label supplier in the Label products list. In the Product number list, choose the product number on your package of labels. Tip: If none of the options match your labels, choose New Label, enter your label's information, and give it a name.
Label a Lot of File Folders Using Word's Mail Merge - Susan C. Daffron
Mail Merge Labels In Word 2007 : Detailed Login Instructions| LoginNote Open a blank Word document From the Ribbon, select the Mailings tab In the Start Mail Merge group, click START MAIL MERGE » select Labels... The Label Options dialog box appears. From the Label products pull-down list, select the brand name of your labels NOTE: The most common brand is Avery standard. More ›
How To Make A Product Label In Microsoft Word | Arts - Arts
How To Print Address Labels Using Mail Merge In Word Open Word and create a blank document. Click on the MAILINGS tab at the top of the page. Click on START MAIL MERGE and select STEP BY STEP MAIL MERGE WIZARD. This opens the Mail Merge Wizard panel on the right hand side of your screen. This panel will guide you through the SIX STEPS of the mail merge.

Word Mail Merge with 4 labels per page repeats second record page 2 - Microsoft Community
How to Create and Print Labels in Word Using Mail Merge and Excel ... Click the Mailings tab in the Ribbon and then click Start Mail Merge in the Start Mail Merge group. From the drop-down menu, select Labels. A dialog box appears. Select the product type and then the label code (which is printed on the label packaging). You may also select New Label and then enter a custom name and size. Click OK.

Barcode labels in Microsoft Word 2003 and XP Mail Merge
How to Make Mailing Labels from Excel by Using Mail Merge Find your Excel spreadsheet from Step #1 and click Open . 8. Review the data and click Ok. Click Next: Arrange your labels. 9. Move your cursor to the first label and click Address block. Select your preferred formatting (using the preview pane). 10.

Word Mail Merge Next Record - DORWQ

The Microsoft Dynamics Crm Club: How to create a Microsoft Word mail merge document with ...
Alwanza.net - Docs & Demos - How to make 3 up labels in Microsoft Word 2003
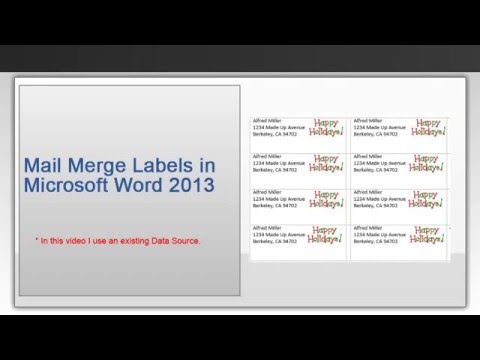
Mail Merge Labels in Microsoft Word 2013 - Using an Existing Data Source - YouTube
Post a Comment for "41 how to create labels using mail merge in word 2010"